• Blog
  • About
  • Recipes
  • Tips & Tools
  • International LOVE
  • Love Notes
  • Shop
  • Powered by MSI Media Group

Engaging stories of love, joy, comfort and friendship with proven scrumptious, healthy recipes, we celebrate LOVE as the secret ingredient for wonderful food!

A Salt Problem and Pumpkin Woes

November 24, 2014 by Mary 11 Comments

Our youngest passed his orals for his Ph.D at Yale! YAY!!!!

So we wanted to celebrate with everyone, both boys and their girls. I wanted to make a special meal, filled with Zach’s favorites for last night (Sunday dinner) – starting with crab cakes with a chipotle mayo and then an herb crusted rack of lamb, farro with olive oil, sherry vinegar and parsley, and roasted asparagus.

Well, I had a salt problem. I followed a new recipe for the lamb that had me salting the meat and adding salt to the breadcrumb mixture too. As I was doing it, I was like, uh, (in my mind) this is too much salt, but with all the commotion of everyone being home and in the kitchen with me, I soldiered on, talking and following the recipe instructions. WRONG!!! And at such expense with the meat ($68.00), to screw it up with too much salt! I should have known better, as I was questioning myself while doing it. One should always trust your intuition, right? And as all you cooks out there know, with a meal like this, if people aren’t ooing and ahhing, there’s something wrong. My husband was sweet and said it was cooked perfectly. My boys were honest and the girls liked it, but one was sick so taste buds were off. I felt SO bad! I ruined what could have been a spectacular meal! Made me weepy and sad. I hate salt problems!!!

So that’s the sad part – but always being the optimist – here’s the funny part of the weekend.

Cutting a pie pumpkin with a hammer and screwdriver.

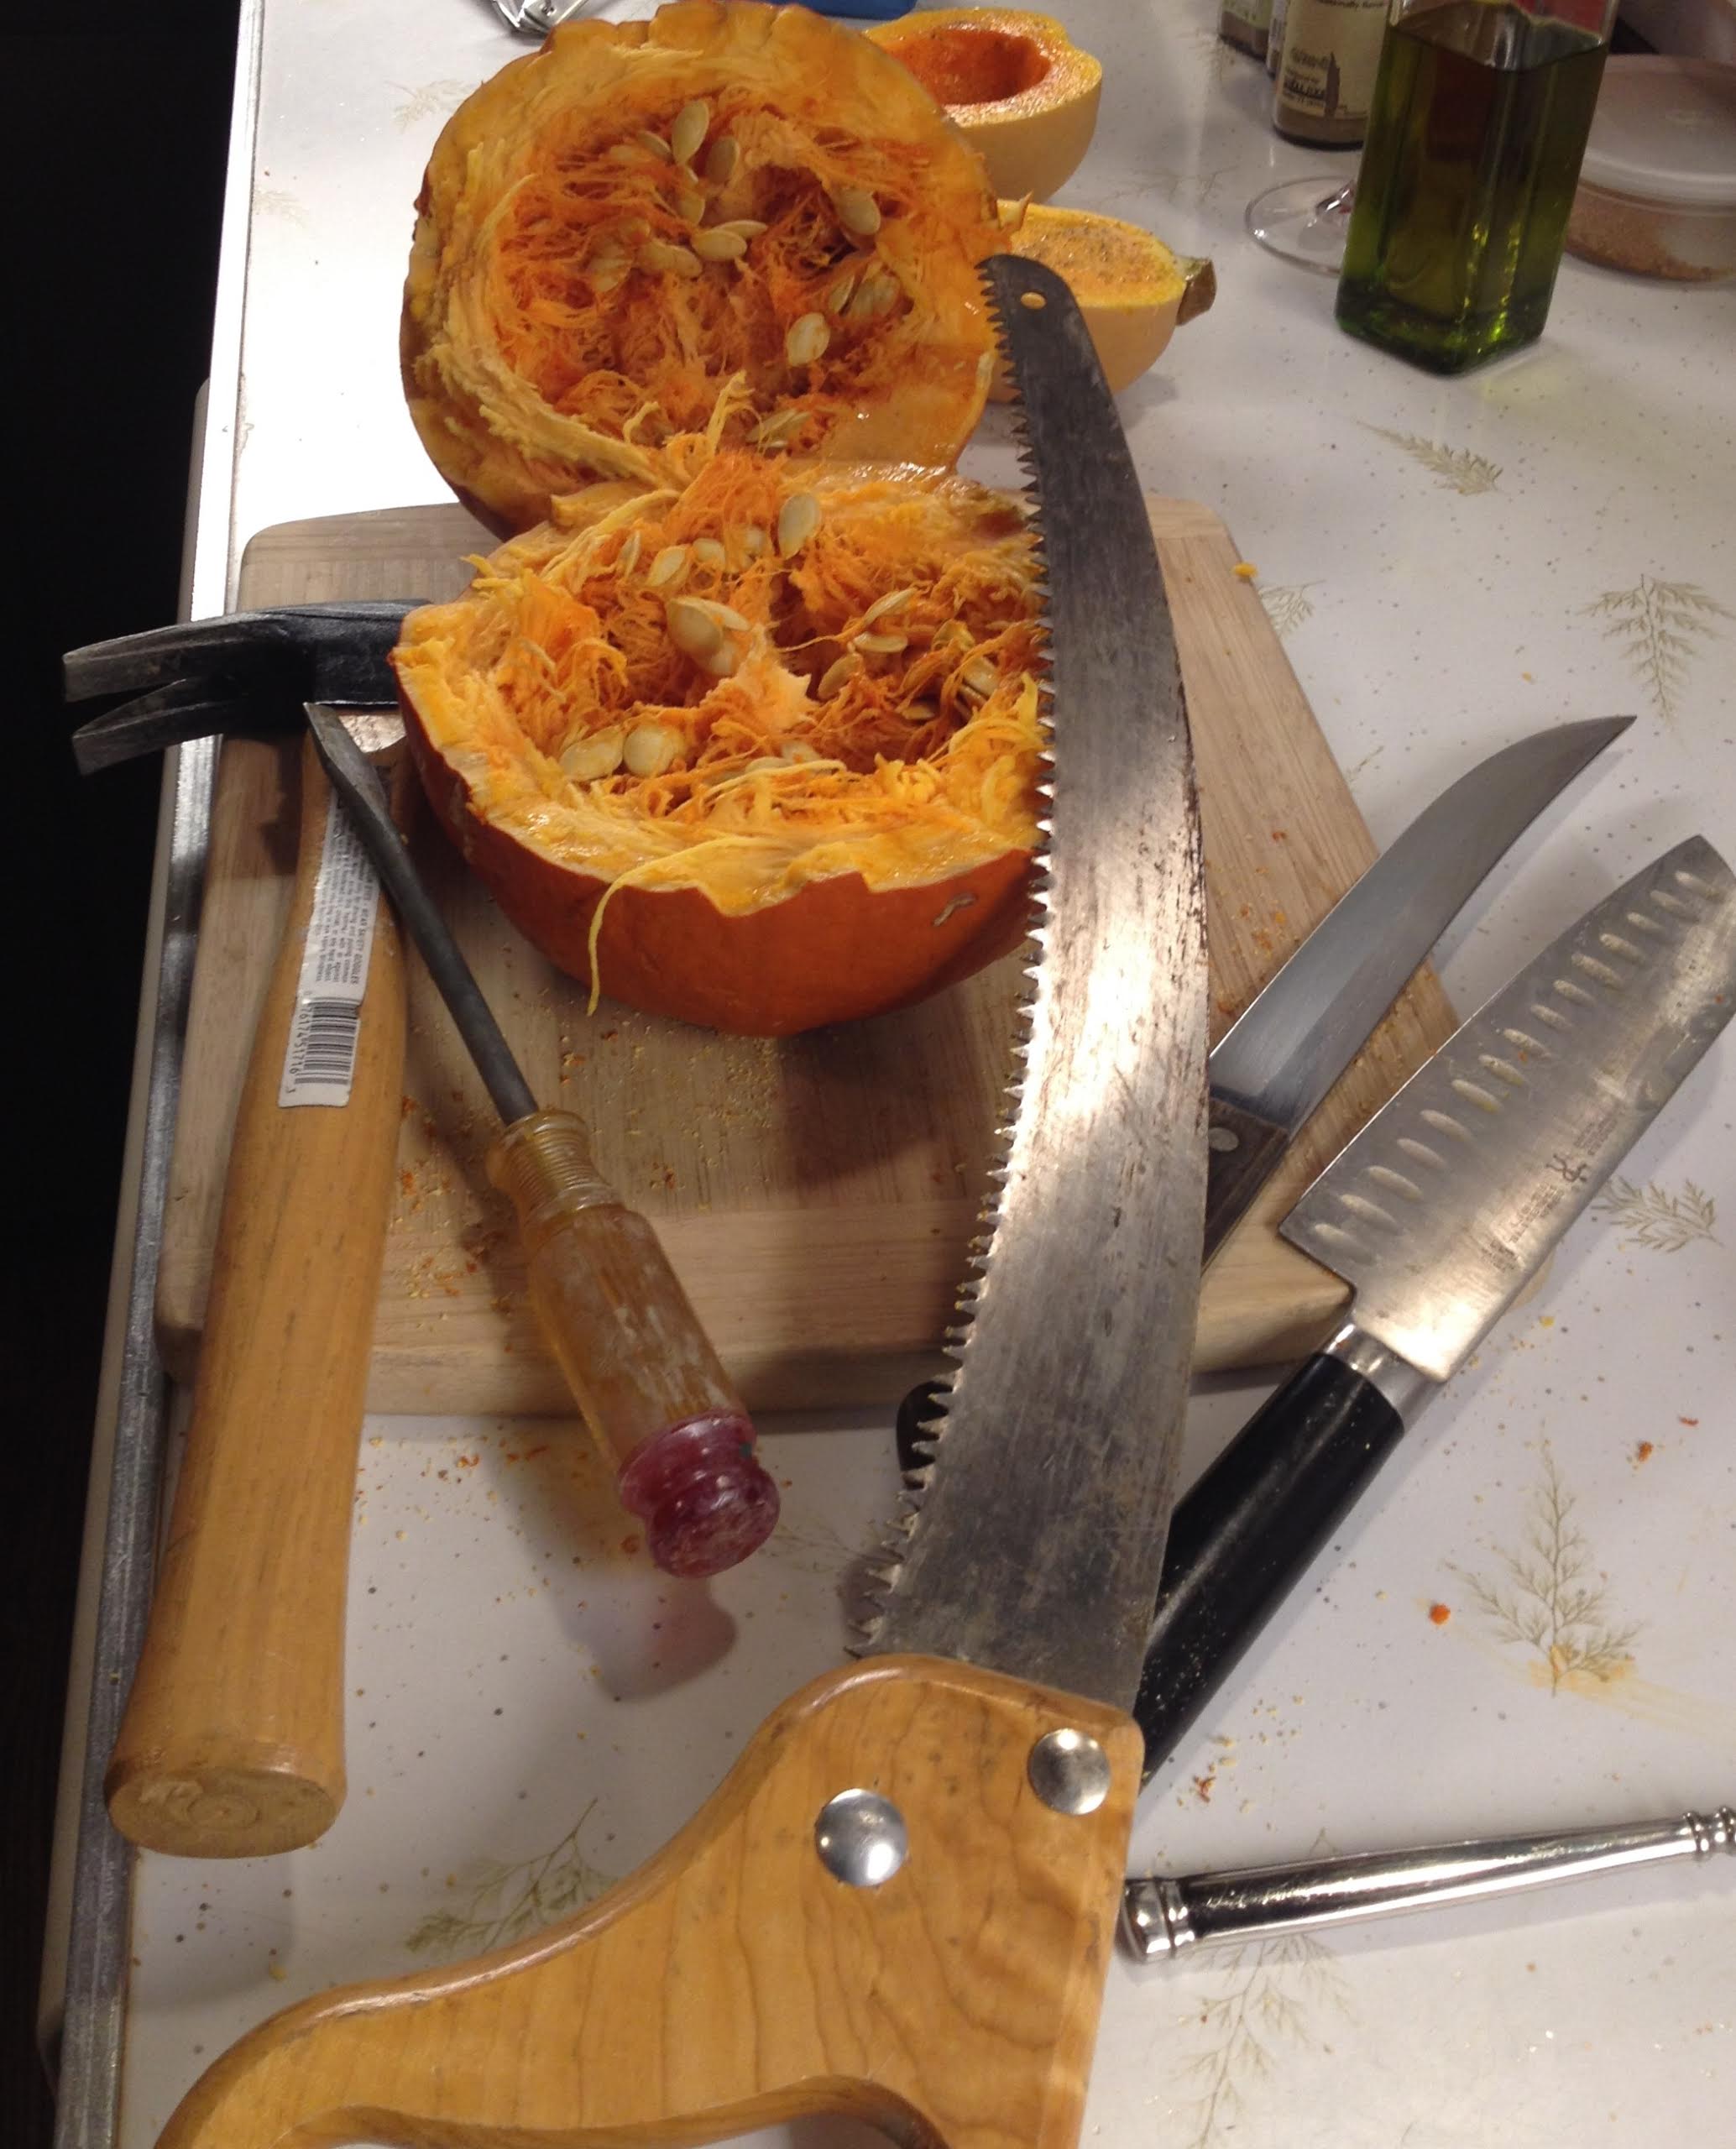
Take a look at my husband helping me cut open my pie pumpkin to roast. Pie pumpkin cutting tools.Yes, that’s right, after numerous knives, we tried the saw from his tool chest. When that didn’t work we went to a screwdriver with a hammer and worked our way around the pumpkin. Pie pumpkin shell after roasting.After I roasted it and removed the pulp, you could have used the skin as a helmet, it was that hard. Maybe they did use these as head protectors for battle a long, long time ago. Meanwhile this pulp is flavorful and not at all watery. It actually has a little bit of the texture of spaghetti squash. I will puree it on Wednesday in order to bake the pumpkin pie on Thursday morning and let you know how it comes out. Have you all ever had a pie pumpkin like this? It’s a first for me!

Filed Under: Dinner Tagged With: cutting pie pumpkins, heavy tools to cut a pumpkin, roasting pumpkins for pies

The big day is coming – Thanksgiving 2014

November 21, 2014 by Mary 3 Comments

I just LOVE Thanksgiving!! My favorite holiday and right around my birthday. This year, my birthday is the day before. My boys with their girls and my husband always plan something great (no pressure guys, if you’re reading this). And this year, once again we get to have all of them at our home in the country along with a dad of one the girls. We are all so excited!!Thanksgiving recipes and process in an e-book format, beautifully designed to give you a magnificent feast.

The turkey has been ordered and cranberries have been bought but that’s it. Ever since I wrote the cookbook, that has a schedule, process and my favorite recipes for the big day, I can relax, because honestly I have it all written down now and can just follow my own e-cookbook! It’s really great. You can download it to your Kindle here. I’m super excited for the cornbread apple stuffing I make, as well as the cranberry ginger sauce and the giblet gravy, all surrounding the big bird.

Thanksgiving centerpiece to make with kids out of vegetables.I was recently invited to a special lunch at Bill Telepan’s new Telepan Local restaurant. It was all about encouraging folks to eat vegetables, especially local vegetables. Just take a look at this centerpiece.

You too can make this – especially a fun project if you have younger kids! Cut 2 flat sides perpendicular to each other on an acorn squash and use toothpicks to put in the other vegetables. Use cloves for the eyes. Enjoy!!

Filed Under: Dinner Tagged With: best Thanksgiving recipes, favorite Thanksgiving recipes, how to cook a Thanksgiving meal, Thanksgiving centerpieces to make with kids, Thanksgiving cookbook, Thanksgiving process guide

Pasta with Salmon and Broccoli

November 15, 2014 by Mary 7 Comments

Pasta with salmon and broccoli .
We all had seconds. Some even had thirds. My sister-in-law said, “Please remember what you did”. This Pasta with Salmon and Broccoli was a lunch dish for the four of us. I made it up. The combination of ingredients was simply something I had in my head that I wanted to eat. I looked for a bit but couldn’t find any recipe that resembled what I had in my mind. This worked, really well I might add!

My sister-in-law, Trish, is gluten intolerant so I used a brown rice pasta – penne – and we all agreed it was decidedly lighter that way. My brother Steve brought a beautiful bottle of Sancerre to pair with this and it was perfect. An ideal Saturday afternoon lunch!

There are a fair amount of steps in this recipe, but they are all simple and at least three of them can be done in advance – from the fried capers, to the spice rub for the salmon (which can be used on any fish), and the blanched broccoli florets. Everyone thought there was cheese in this dish but no, no cheese, (the Italians taught me to NEVER combine cheese and fish), yet the yogurt provides the satisfying creaminess, in a much healthier manner. The broccoli had a bit of crunch, in contrast to the creaminess of the salmon with the tang of the lemon zest, and every once in a while, encountering the crunch and punch of saltiness from the fried capers, all made this recipe is a keeper. Make it with LOVE, serve it with some crusty bread and a crisp white wine, and I guarantee you’ll feel all warm and satisfied after a meal like this.
Pasta with salmon and broccoli topped with fried capers-single serving.
PASTA WITH SALMON AND BROCCOLI – serves 4 – 5

Vegetable oil for frying
1/4 cup of capers, rinsed, drained and patted really dry to fry
3 cups broccoli flowerets
1.5 lbs center cut salmon fillet with skin
2 tsp. Dijon mustard
Fantastic Fish Rub – see separate recipe
1 Tbs. olive oil
2 Tbs. olive oil
3 large cloves of garlic, thinly sliced
Coarse sea salt for pasta water
1 lb. brown rice penne pasta
1/3 cup pasta water
1/3 cup 2% plain Greek yogurt
Zest from I whole lemon

Heat your oven to 425 degrees.

PREPARE THE CAPERS: In a skillet, heat 1/4 inch of vegetable oil until shimmering. Add the capers and stand back until all the moisture is out of the capers. Remember, oil and water do not mix (I learned this from my old printmaking days) so do not try to stir until all the nonsense (splattering) is over. Fry over moderately high heat, stirring, until browned and crisp, about 3 minutes. Using a slotted spoon, transfer the capers to paper towels on a plate to drain. Set aside.

MAKE THE FANTASTIC FISH RUB: This is for approximately 3 lbs. of fish, so you will have some of this lovely stuff left over to use later.
1 tsp. sweet paprika
1 scant TBS. of yellow mustard seeds
1 heaping TBS. of ground cumin
1/2 tsp. of crushed red pepper
Throw it all in a mini spice grinder and grind up.
Use on fish to cover – Great on cod, scrod, salmon, tilapia, shrimp, swordfish, Chilean sea bass, or really any hearty, meaty fish. Use the Canadian cooking method for roasting or grilling any type of fish. Figure on 10 minutes for each 1 inch of thickness at 425 degrees.

Broccoli flowerets on a cutting board.

MAKE THE BROCCOLI FLORETS: Wash and cut your broccoli as shown here in the photo. Bring a large pot of water to a roiling boil, salt it with coarse sea salt, add the broccoli flowerets and let them be in there for 1 minute, until they turn bright green. Parboiled broccoli flowerets.Drain and immerse in cold water with ice cubes to stop the cooking. Drain and pat dry.

MAKE THE SALMON: Wash and pat dry the salmon. Spread the 2 tsp. of Dijon mustard on top, salt and fresh ground pepper, and generously sprinkle on evenly some fish rub to coat. Heat a non-stick skillet on medium high heat with 1 Tbs. olive oil. Put in salmon, seasoned side down for 3 minutes. Carefully turn over and put in the oven for 8 minutes. When finished, remove from the skillet and place on a platter. Flake the salmon after about 5 minutes.

Bring another large pot of water to boil for your pasta. Meanwhile, warm the olive oil over low heat. Add the garlic slices and warm up, stir, let them only get slightly golden. Add the broccoli flowerets to warm and cook them a bit more. Salt the pasta water generously with coarse sea salt. Start cooking your pasta until al dente, about 2 minutes less than the package directions tell you. Flake the salmon from the skin (discard) while the pasta is cooking. Measure out your yogurt too. Save at least a cup of the pasta water, and drain the pasta. Add the pasta and 1/3 cup pasta water to the broccoli with the garlic and toss and cook a bit more until pasta is done.

So now you need to combine everything and make this magnificent dish!

In a large shallow bowl, combine the pasta-broccoli-oil combination, the flaked salmon, and the yogurt. Gently fold all together. Zest the lemon on top. Fold again. Only add more pasta water if necessary. Taste and season with salt and pepper. Serve and top with the fried capers for extra crunch and salt. Enjoy!

Filed Under: Dinner Tagged With: brown rice pasta dishes, fantastic one dish meals, fish with pasta meals, pasta with salmon and broccoli

Cumin and Mustard Roasted Chicken with Fruit

November 8, 2014 by Mary 9 Comments

We had some friends over for dinner on Tuesday night. They were coming at 7 pm. I got home at 6:15. I thought that getting home so late might happen so I had set the table the night before and had planned an easy dinner of grilled Cauliflower Steaks with an herb salsa verde as a first course (divine), followed by roasted sumac chicken stuffed with fennel stalks and Parmesan cheese rinds, roasted baby Yukon Gold potatoes and roasted tomatoes with olive oil and Greek oregano. Simple, yet if done right, perfectly delicious and comforting after a full days work on an early fall evening. Paired with a Petit Syrah and we were set!

Grilled cauliflower steaks with an herb salsa verde.

Grilled cauliflower steaks with an herb salsa verde – a great Food and Wine recipe

Now you all have seen my kitchen in our videos. It is a galley that is completely open to the living room. With a small gathering, our guests sit right across the counter from me while I’m cooking, and literally see everything. So all is going well until I start to open the organic chicken package only to discover that it’s not a whole chicken! It is chicken parts, and badly cut at that, yet they had put it together in the package to appear as a whole bird!! Well I was surprised, flustered, and of course, a little ticked off at my husband, as he picked out the meat that shopping trip. (I had to blame it on someone!) So now, in my head, I was scrambling, what was I to do? I was searching for something with great flavor to work with, quick, at that late hour. What did I have? No pancetta, which is a great way to add some big flavor in no time. There was no time to make a tomato sauce, no nice savory jams in the fridge. No mushrooms on hand and no time to caramelize onions. Really, my mind was racing while making small talk to my guests sitting right in front of me!

So I thought to start with a little butter and olive oil, instead of just the oil. Salt and pepper on the skin side, added a sprinkling of cumin on the other side. White wine is always good and then I smeared some Dijon mustard on top. Then I saw this box of dried fruit on the counter to the left of my stove. I had just bought it last week to serve with some lovely cheeses, but that never happened. So I thought, what the heck, let’s try this. I topped each chicken piece with slices of fruit – apricots, apples, peaches, pears and prunes, and then threw the whole thing in the oven for about 17 minutes and voila, it was divine! And the oven was hot – 450 degrees for that roast chicken that wasn’t to be – so the fruit got golden and beautiful and dinner was saved. This new recipe is good enough to share, good enough to repeat, and different too! The only thing was that the roasted tomatoes with oregano sort of no longer went with the other food – but they tasted good with the potatoes!

Has this sort of thing ever happened to you? Please share.Cumin and mustard roasted chicken with fruit.

CUMIN AND MUSTARD ROASTED CHICKEN WITH FRUIT – serves 4

One whole organic chicken, backbone removed, cut into 8 pieces, extra skin and fat trimmed
1 Tbs. olive oil
1 Tbs. unsalted butter
Salt
Pepper, fresh ground
11/2 tsp. ground cumin
½ cup dry white wine
4 tsp. Dijon mustard
16 – 18 slices of mixed dried fruit – apricots, peaches, pears, apples and prunes
1 – 2 Tbs. Chopped Italian parsley for garnish

Preheat the oven to 450 degrees.

Wash and dry the chicken pieces, all fat and extra skin trimmed off. Salt and pepper skin side.

Warm olive oil and butter on medium high heat. Swirl to combine and when butter stops sizzling, place the chicken in the skillet, seasoned side down to brown and crisp skin for 3 – 4 minutes. While that side is browning, season the top side with salt, pepper and cumin. After the first side is nicely browned, turn chicken pieces over and brown the other side for two minutes, then add the white wine and spread the mustard on top of each piece. Then place 2 pieces of dried fruit on top of each lightly mustard coated piece. Put 2 – 3 pieces of fruit on each of the breasts, depending on the size of the fruit. You want to essentially cover the top of the chicken.

Place the skillet in the oven and roast for 15 – 18 minutes. Check doneness with a thermometer – should be 160 – 165 degrees. Remove chicken pieces to a platter, keeping the fruit on top. Pour any juices left in the skillet on top of the chicken. Let rest for 10 minutes and sprinkle chopped parsley on top and serve with LOVE.

Filed Under: Dinner, First Course, Poultry, Vegetables Tagged With: cauliflower steaks with herb salsa verde, cumin and mustard roasted chicken with fruit, easy chicken recipes, fast chicken dishes, weeknight dinner parties

Perfect Poach!

October 31, 2014 by Mary 8 Comments

Perfect Poach packaging.I love poached eggs! Poached eggs and corned beef hash – my all time favorite diner breakfast! I know, lots of calories, but every once in a while…a bit of heaven. Did I ever make poached eggs at home? No. Never. Too scared they’d just be a mess. And then I kinda remembered from my mom that you were supposed to put in a little vinegar or something…too complicated, especially when you’re really hungry in the morning and just want to eat quickly.

Well Perfect Poach is here to the rescue! This is our seventh and last item in our fall MARY’s secret ingredients box. This is from the Tovolo company and they believe that time spent cooking should be fun. They believe in creating kitchen tools that out-perform your expectations, but also put a smile on your face. Isn’t that nice?

Perfect Poach pouches flat on a wooden cutting board.So here are these little babies. They’re open-ended little bags, made of coffee filter-like material and shaped like the toe of a shoe. You put these in cups and open up the top. Bring a pot of water to a boil, then reduce to a simmer.

Perfect Poach pouches in cups ready to go.Crack your eggs into each cute little bag and immediately pick up the bag with tongs and lower it into the simmering water – four minutes for a soft yolk poached egg, six to seven minutes for a harder poached egg, like my husband prefers. Lift those little bags out with tongs when ready and place on a side plate. Tilt out any water that got into the bag on that side plate, because you don’t want water on your toast. Poached eggs on toast.Then slide the little bugger onto your toast. Voila! A perfect poached egg – courtesy of Perfect Poach. You can check out their website for other little handy tools that will also brighten your day. I LOVE people who want to make my life easier and put a smile on my face!

Filed Under: Breakfast, Brunch Tagged With: how to make perfect poached eggs, Perfect Poach, poached eggs, Tovolo products

Spinach Dip Mix Omelette

October 28, 2014 by Mary 9 Comments

The Spinach Dip mix is our 6th item in our fall MARY’s secret ingredients box. This dip mix is made by a sweet company in Florida, called The Pantry Club. The company was founded by husband and wife team, Alicia and Matt Webb, and while typically I’m not a dry mix user kinda gal, this dip is totally all natural and when rehydrated, tastes just like a fresh spinach mixture. Alicia and Matt have changed my mind about dry mixes. Just smell the fresh goodness coming out of it. And, it’s gluten free!Spinach mix dip in a bowl with crudites and crackers.

 
The Pantry Club spinach dip mix.Of course you can make a dip out of it for crudités, crackers or pita chips. They say to make it with sour cream and mayonnaise. I used zero fat unflavored Greek yogurt and added the 2 tablespoons of mayonnaise or you might try adding 2 tablespoons of olive oil as my friend Daina did. It is important to make it ahead of time and refrigerate it for at least 2 hours, as they recommend. You need that time to let the flavors meld and bloom from their dried state.

Alicia and Matt also say you can use the dried dip as a flavoring agent. Perhaps adding it to a vegetable broth with some juices from sautéing skinless boneless chicken breasts would be great. But what I found to be super terrific is to add it to eggs to make the most delicious spinach omelette. Try this with your mix!Spinach dip mix whole omelet. Spinach mix spinach omelet piece from Oct 19, 2014


THE PANTRY CLUB SPINACH DIP MIX OMELETTE WITH SUNNY GOLD TOMATOES, PARSLEY AND ROMANO CHEESE – serves 2

4 eggs
2 Tbs. whole milk
½ package of The Pantry Club Spinach Dip Mix
1 Tbs. unsalted butter
½ cup sunny gold tomatoes, quartered
2 Tbs. roughly chopped parsley leaves
¼ cup grated Pecorino Romano cheese
Additional parsley sprigs for garnish

Heat oven to 350 degrees. Beat eggs and milk with a whisk. Slowly add in the ½ package of Spinach Dip Mix and mix thoroughly to combine.

Melt butter in a large skillet over medium high heat. Swirl to completely cover bottom and sides of the pan. Pour in egg mixture. Let sit until the bottom has just cooked. Then transfer the skillet to the oven to let the eggs cook on top for about 5 minutes.

Bring skillet back up to the stovetop (make sure you’ve got a hot pad on the skillet handle) and scatter the tomatoes, parsley and cheese over one-half of the omelette. Fold over the remaining egg side on top and let cook until eggs are done to your liking. Or put back in the oven for a minute or two.

When done, slide out of the pan and onto a platter. Garnish with parsley and serve with LOVE!

Enjoy!!

Filed Under: Appetizers, Breakfast, Brunch Tagged With: best brunch food, spinach dip, spinach dip mix, spinach omelette, The Pantry Club spinach dip mix

  • « Previous Page
  • 1
  • …
  • 34
  • 35
  • 36
  • 37
  • 38
  • …
  • 49
  • Next Page »

  • Facebook
  • Instagram
  • Pinterest
  • Twitter

Join 32k+ followers!


Never miss out on a recipe!

Subscribe to receive new posts via email:

Mary Frances

Mary Frances

Spread love through cooking.

Summer Favorites

Easy Cheesy Sautéed Squash The Best Potato Salad Super Quick Chicken and Summer Vegetables Stir-fry Chimichurri-ed Wilted Endives with Walnuts Chilled Curried Zucchini Soup with Apple Garnish Best Strawberry and Rhubarb Crisp to make now!

Categories

  • Appetizers
  • Breakfast
  • Brunch
  • Cocktails
  • Contest
  • Cookies
  • Cookware and tools
  • Desserts
  • Dinner
  • Events
  • First Course
  • Fish
  • Food Responsibility
  • Guest Post
  • Lunch
  • Meat
  • Pasta
  • Poultry
  • Products for sale
  • Salads
  • Sauces
  • Sides
  • Soups
  • Tea time
  • Travel
  • Vegetables

Pages

Blog
About
Recipes
Tips and Tools
International Love
Love Notes
Shop
Mary's secret ingredients

Blogs We Love

  • 1840 Farm
  • A Pug in the Kitchen
  • Cottage Grove House
  • Food, Photography & France
  • Food52
  • From the Bartolini Kitchens
  • Go Bake Yourself
  • Hotly Spiced
  • Jovina Cooks Italian
  • Lavender and Lime
  • Orgasmic Chef
  • Smitten Kitchen
  • Sophie's Foodie Files
  • Steven’s Wine and Food Pairings
  • That Skinny Chick Can Bake
  • The Pioneer Woman
  • The Squishy Monster
  • Tips on Food and Drinks
  • Yummy Chunklet
  • LOVE - the secret ingredient


  • GET IN TOUCH
  • E mary@lovethesecretingredient.com

· All Rights Reserved ·© 2016 Love- the secret ingredient. All rights reserved. Disclaimer | Privacy Policy Disclosure Policy Terms & Conditions